Circuito (disegnato con Fritzing) |
|
Circuit (designed with Fritzing) |
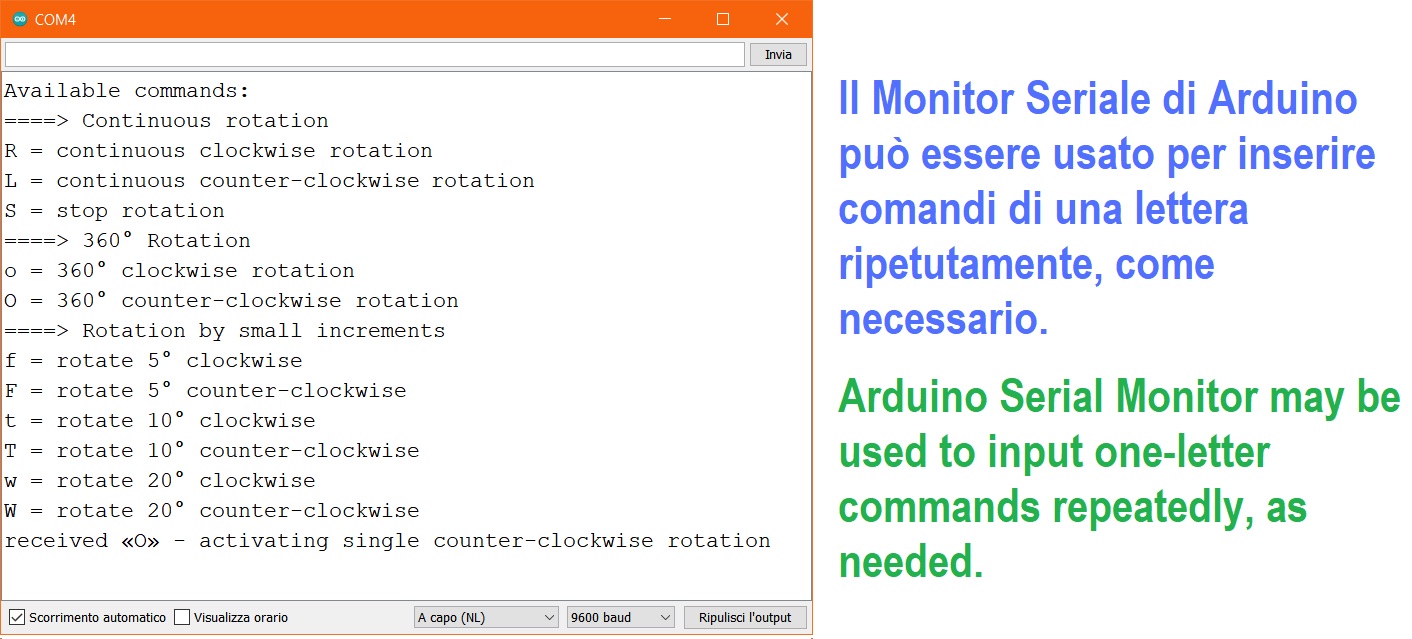
Obiettivi e Software di controlloLa fotomicografia e la macrofotografia beneficiano notevolmente della tecnica del focus stacking. Parlando di microscopi, le pile di immagini sono quasi esclusivamente realizzate lungo l'asse verticale. Numerose immagini vengono scattate spostando il piano focale in piccoli incrementi verticali dopo ogni scatto, di solito ruotando la manopola di messa a fuoco del microscopio. Focheggiare manualmente è difficile da due punti di vista: ottenere incrementi abbastanza piccoli e ottenere il tipo di incrementi uguali e uniformi che garantiscono la migliore qualità dell'immagine successivamente ottenuta dal focus stacking. Il motore passo-passo può fornire la combinazione necessaria di precisione e coerenza. Sono disponibili colonne di focalizzazione motorizzate per microscopi, ma sono molto costose e sono specifiche per ogni marca e modello. Una soluzione più economica, ma costosa, può essere fornita dai tavolini traslatori verticali motorizzati. La proposta qui descritta approssima un tavolino traslatore verticale motorizzato, e può essere controllata tramite Arduino Serial Monitor, collegando Arduino al PC come di consueto, tramite il cavo USB. Dal punto di vista del software, dato che il sistema non comprende sensori di fine corsa, non è possibile prevenire azionamenti erronei: occorrerà un'attenta vigilanza quando il tavolino traslatore si approssima alle sue posizioni estreme, per evitare che il motore passo-passo si danneggi sforzando senza potere avanzare. |
|
Objectives and Control SoftwarePhotomicography and macrophotography benifit greatly from the technique of focus stacking. Talking about microscopes, stacks of pictures are almost exclusively made along the vertical axis. Numerous pictures are taken by moving the focal plane in small vertical increments after each capture, usually by turning the focus knob of the microscope. Manual focusing is difficult from two points of view: obtaining increments small enough, and obtaining the kind of equal, consistent increments that grant the best quality of the image subsequently obtained by focus stacking. Stepper motor may provide the needed combination of precision and consistency. Microscope motorized focusing columns are available, but they are very costly and are specific for each brand and model. A cheaper, yet costly, solution may be provided by motorized Z-stages. The proposal described here approximates a motorized Z-stage, and can be controlled via the Arduino Serial Monitor, by connecting Arduino to the PC as usual, via the USB cable. From the software point of view, since the system does not include limit switch sensors, it is not possible to prevent erroneous operations: careful vigilance will be required when the moving stage approaches its extreme positions, to prevent the stepper motor getting damaged by straining without being able to drive. |
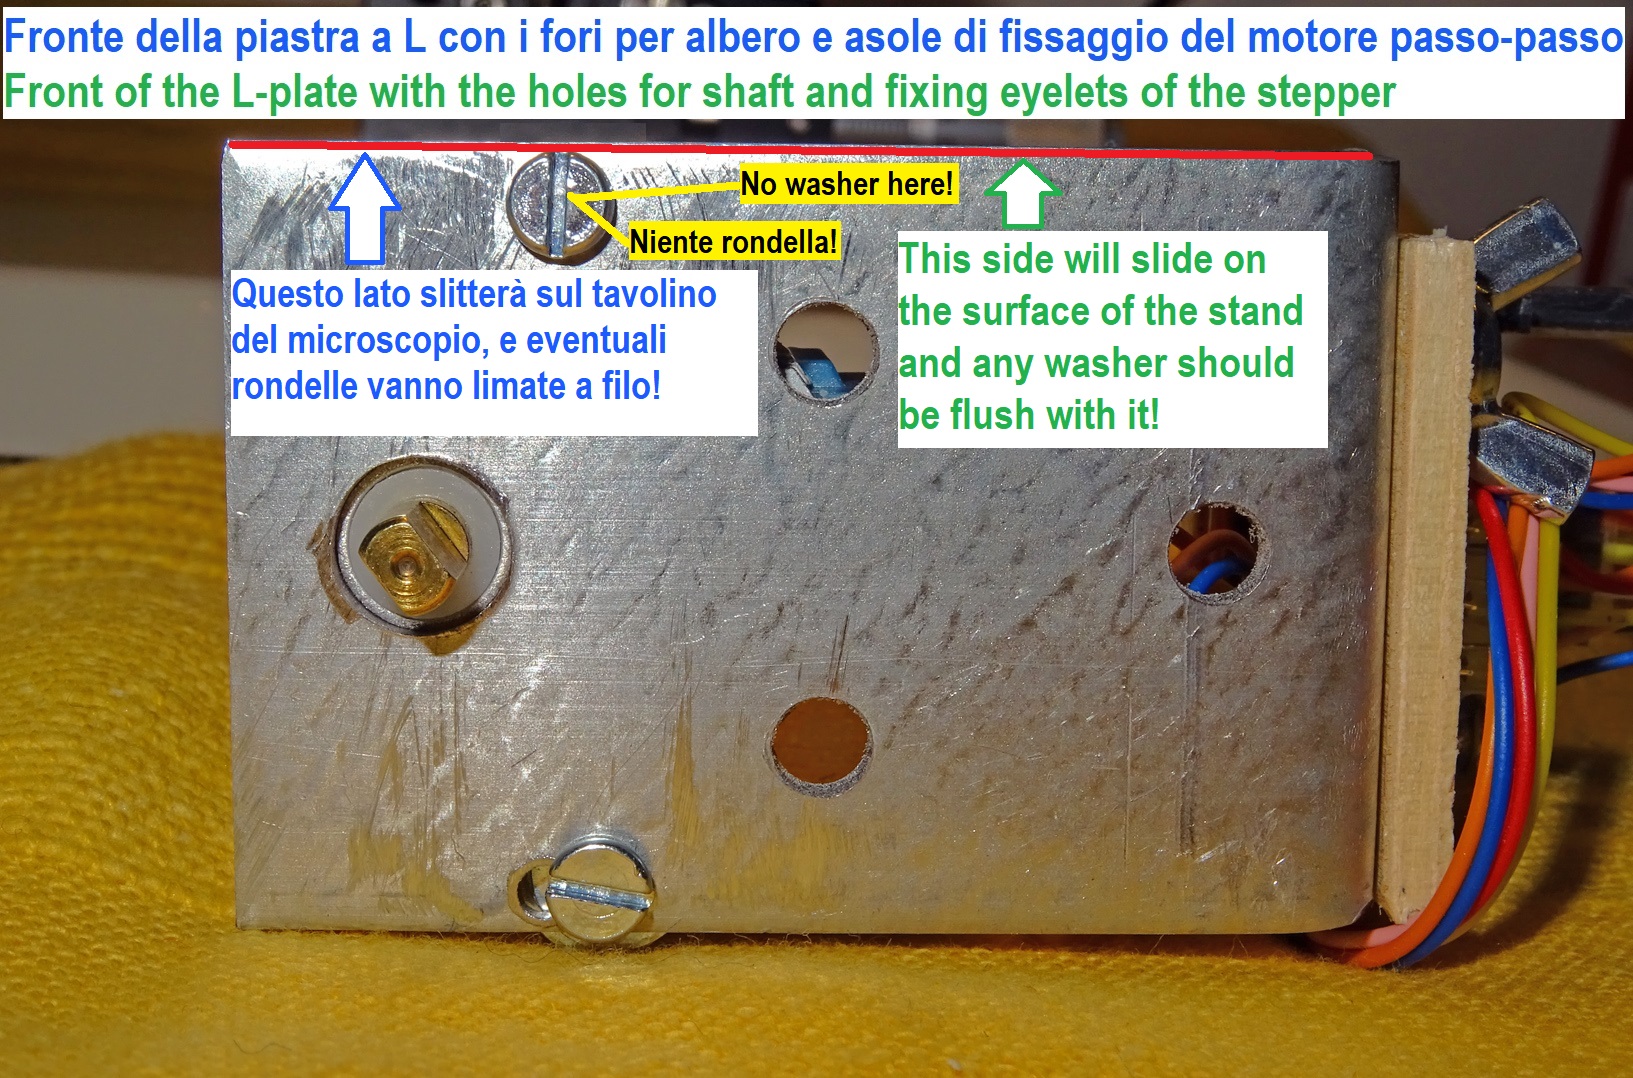
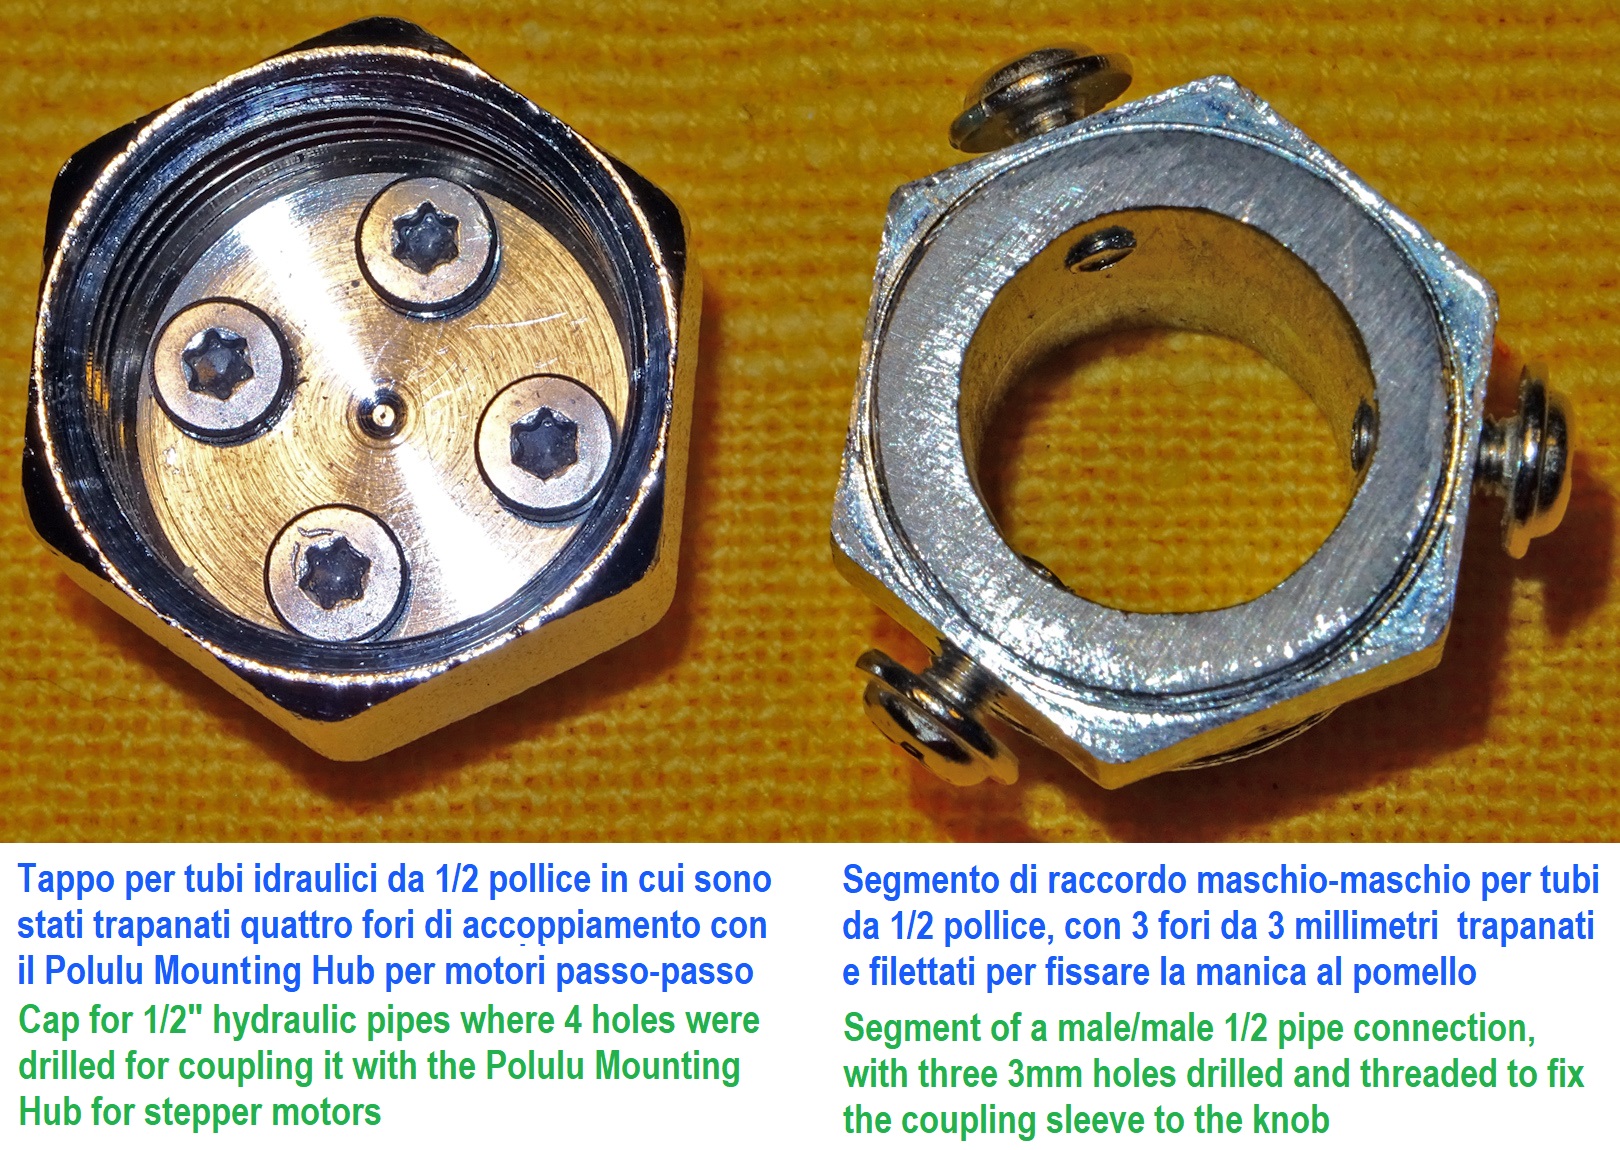
Supporto del motore passo-passoLa soluzione qui descritta è rapida, sporca ed esteticamente non raffinata. La sua efficacia contrasta nettamente con il suo aspetto rudimentale. Considerando che un tavolino per microscopio motorizzato può costare centinaia di euro, si può sospendere il giudizio fino al completamento della costruzione. La soluzione si basa su un piccolo stepper che aziona il pomello di un traslatore verticale meccanico, come si farebbe con le dita. Pertanto, l'accoppiamento meccanico tra motore e manopola deve essere realizzato con un manicotto di dimensioni adeguate. Il manicotto sarà collegato allo stepper grazie a un Pololu Universal Aluminum Mounting Hub for 5mm Shaft. Inutile dire che qualsiasi tentativo di automazione di un traslatore verticale richiede che esso sia montato nella posizione più bassa, sotto gli stadi X e Y, altrimenti la sua posizione potrebbe variare in modo imprevedibile. Ma avere lo stadio traslatore verticale a diretto contatto con il supporto del microscopio non significa necessariamente che il relativo pomello mantenga una posizione fissa: non possiamo dare per scontato che il nostro stepper possa restare fisso e mantenere una posizione statica quando attivato. Sarebbe il caso dei più sofisticati traslatori, basati su ingranaggi a vite senza fine, in cui il pomello rimane statico mentre gli stadi meccanici vengono alzati o abbassati. Ma la soluzione qui proposta riguarda lo scenario peggiore, in cui il pomello si allunga o accorcia quando viene ruotato nei due sensi. Per quanto possa sembrare poco elegante, la necessità di seguire il pomello richiede che lo stepper venga trascinato avanti e indietro dal pomello. Di conseguenza, abbiamo bisogno di un supporto che possa sostenere il motore in modo sicuro, ma scorrere liberamente sulla superficie del supporto da tavolo e abbastanza pesante da resistere alla modesta coppia esercitata dal motore mentre fa girare il pomello. La soluzione più semplice è fornita da una squadretta metallica ad angolo retto. |
|
Stepper supportThe solution described here is quick, dirty and esthetically unrefined. Its effectiveness contrasts sharply with its rudimentary look. Considering that a motorized microscope stage may cost hundreds of dollars, one might suspend judgment until the construction is completed. The solution is based on a small stepper driving the knob of a mechanical Z-stage, in the same way that one would do with his/her fingers. Thus, the mechanical coupling between motor and knob must be made with a small sleeve of suitable size. The sleeve will be fixed to the stepper thanks to a Pololu Universal Aluminum Mounting Hub for 5mm Shaft. Needless to say, any attempt at the automation of a Z-stage requires that it is mounted in the lowest position, under the X and Y stages - otherwise its position may vary unpredictably. But having the Z-stage in direct contact with the microscope stand does not necessarily mean that its knob keeps a fixed position: we cannot take for granted that our stepper can be fixed and keep a static position when activated. That would be the case of the more sophisticated Z-stages, based on worm gears, where the knob remains static while the mechanical stage is raised or lowered. But the solution proposed here deals with the worst scenario, where the knob gets longer or shorter when turned in each direction. Inelegant as it may seem, the need to follow the knob requires that the stepper is dragged back and forth by the knob. Consequently, we need an assembly that can hold the motor firmly, yet slide freely on the surface of the table stand, and heavy enough to resist the modest torque exerted by the motor when turning the knob. The easiest solution is provided by a right-angled metal brace. |
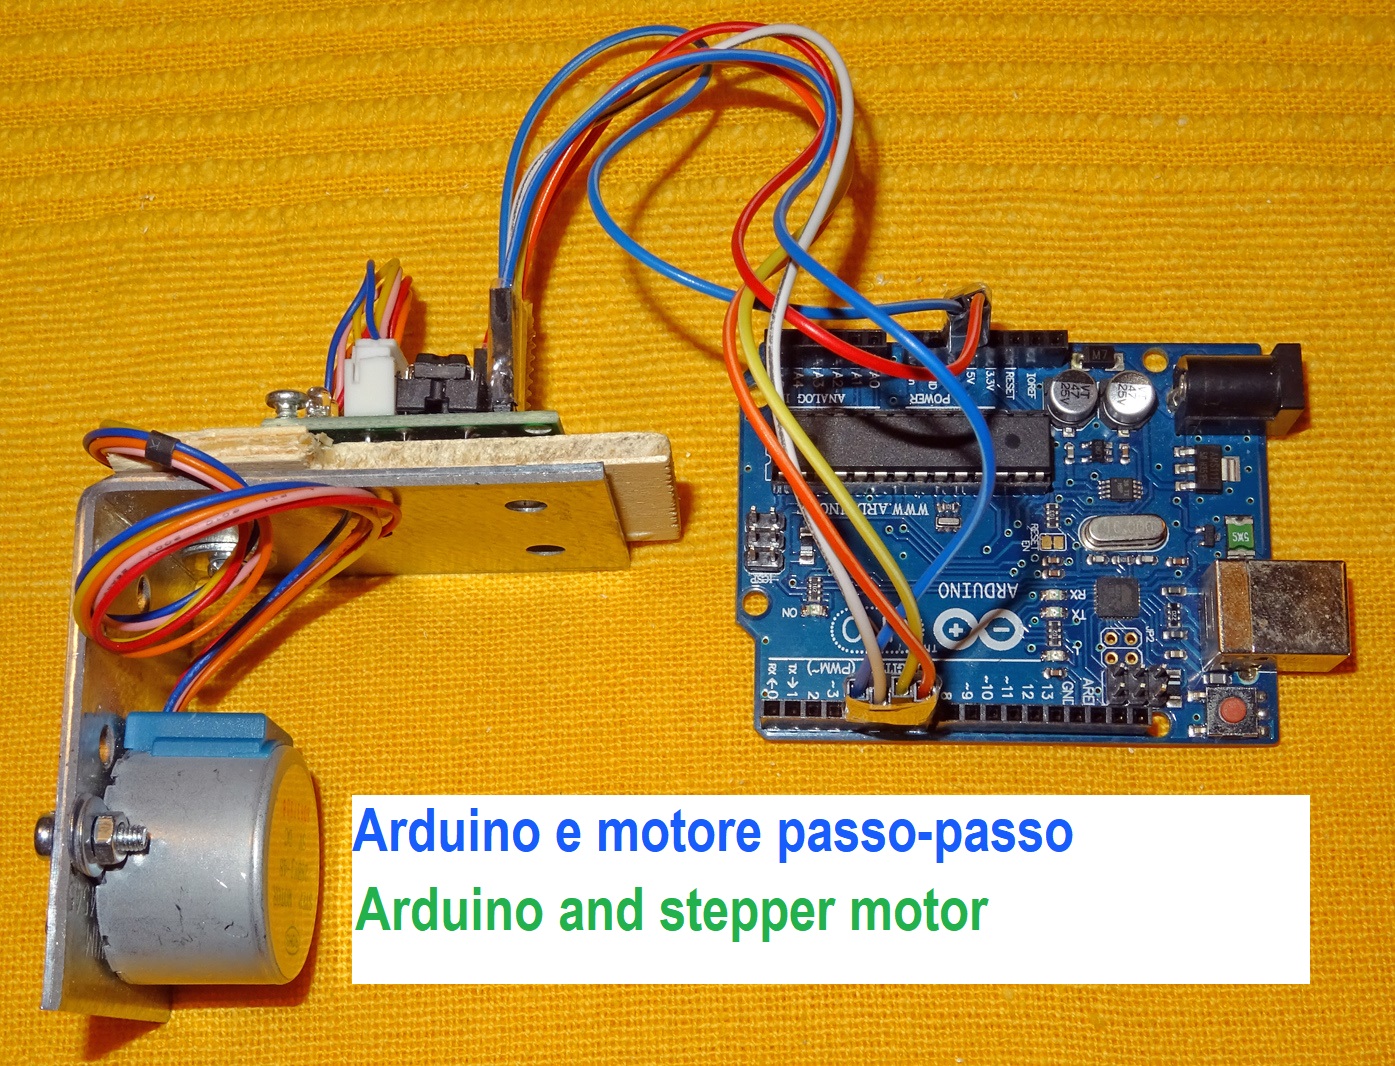
Connessione tra Arduino e motore passo-passoLa squadretta angolare giacerà (e slitterà) sul tavolino del microscopio come mostrato dalla fotografia. |
|
Connection between Arduino and stepper motorThe angled brace will lay (and slide) on the microscope table stand as illustrated in the picture. |
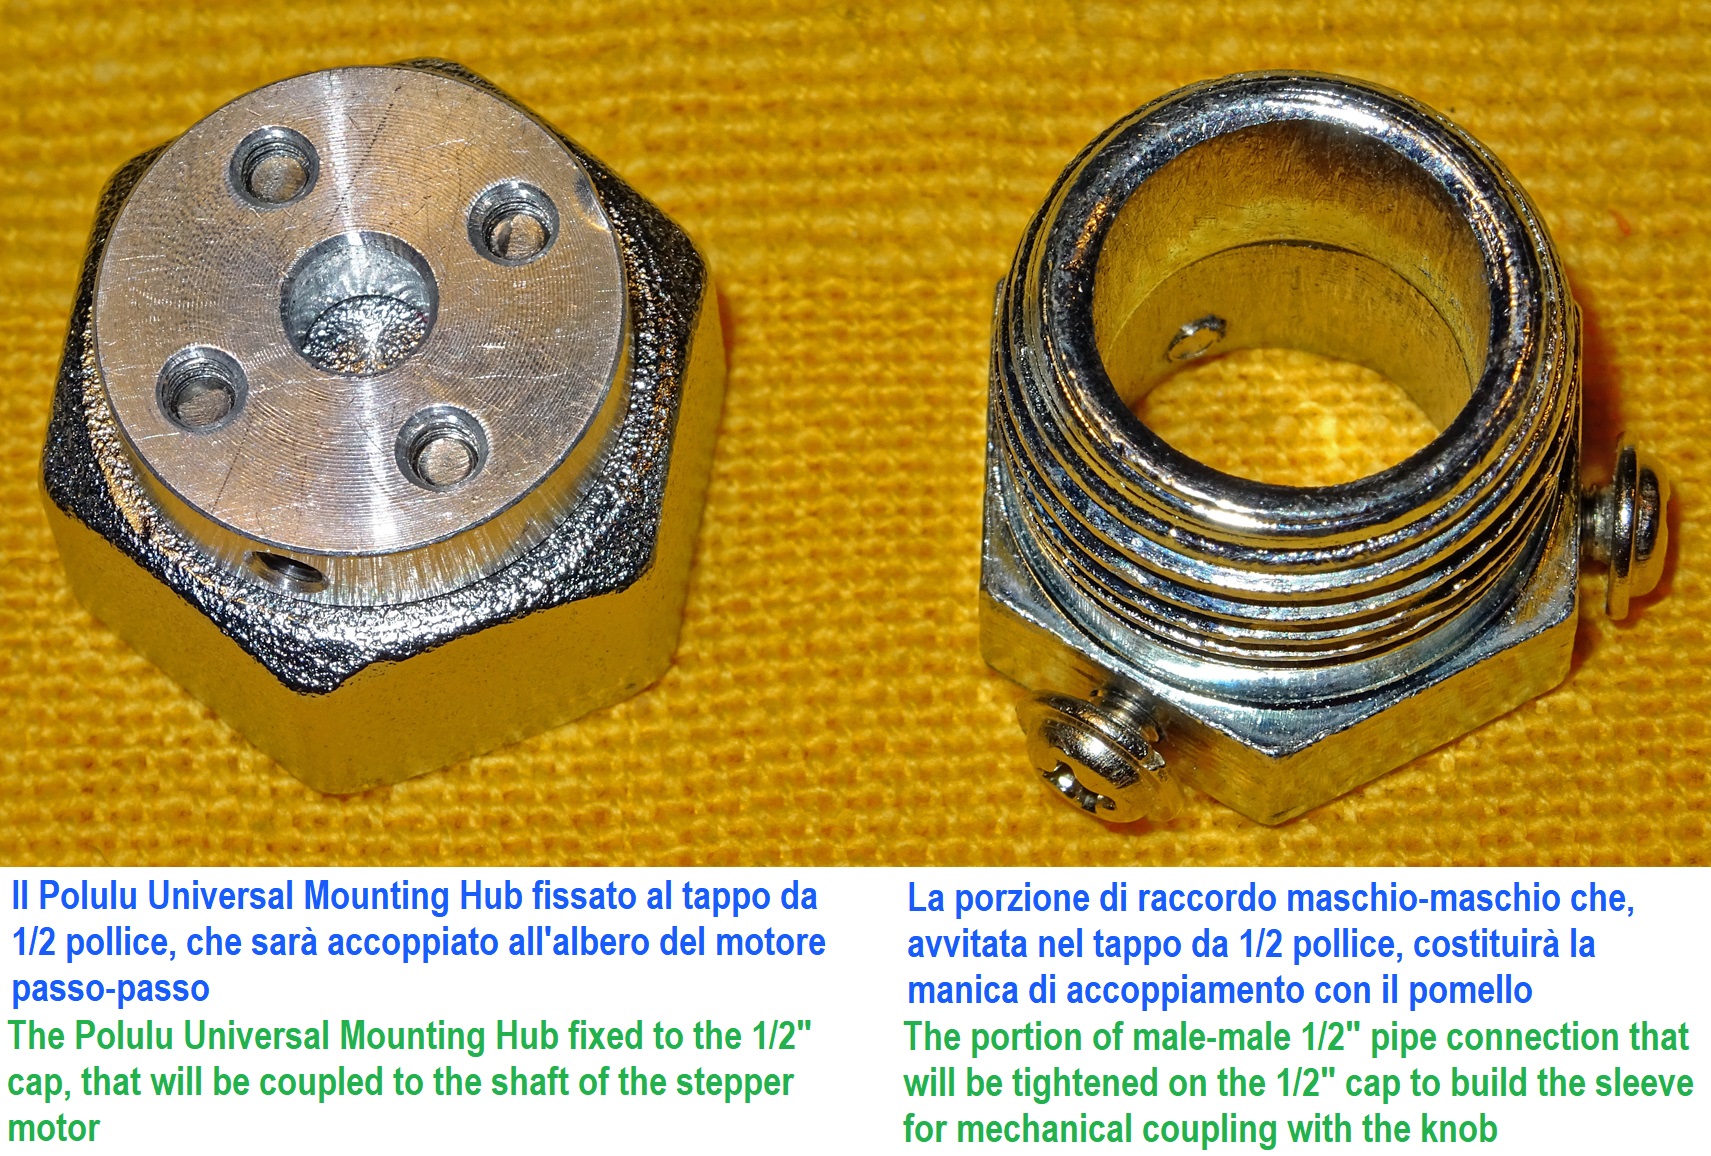
Componenti della manica di accoppiamento con il pomelloL'immagine è autoesplicativa e mostra il lato interno dei componenti del manicotto. |
|
Components of the knob-coupling sleeveThe picture is self-explanatory and shows the inner side of the sleeve components. |
Componenti della manica di accoppiamento con il pomelloL'immagine è autoesplicativa e mostra il lato esterno dei componenti del manicotto. |
|
Components of the knob-coupling sleeveThe picture is self-explanatory and shows the outer side of the sleeve components. |
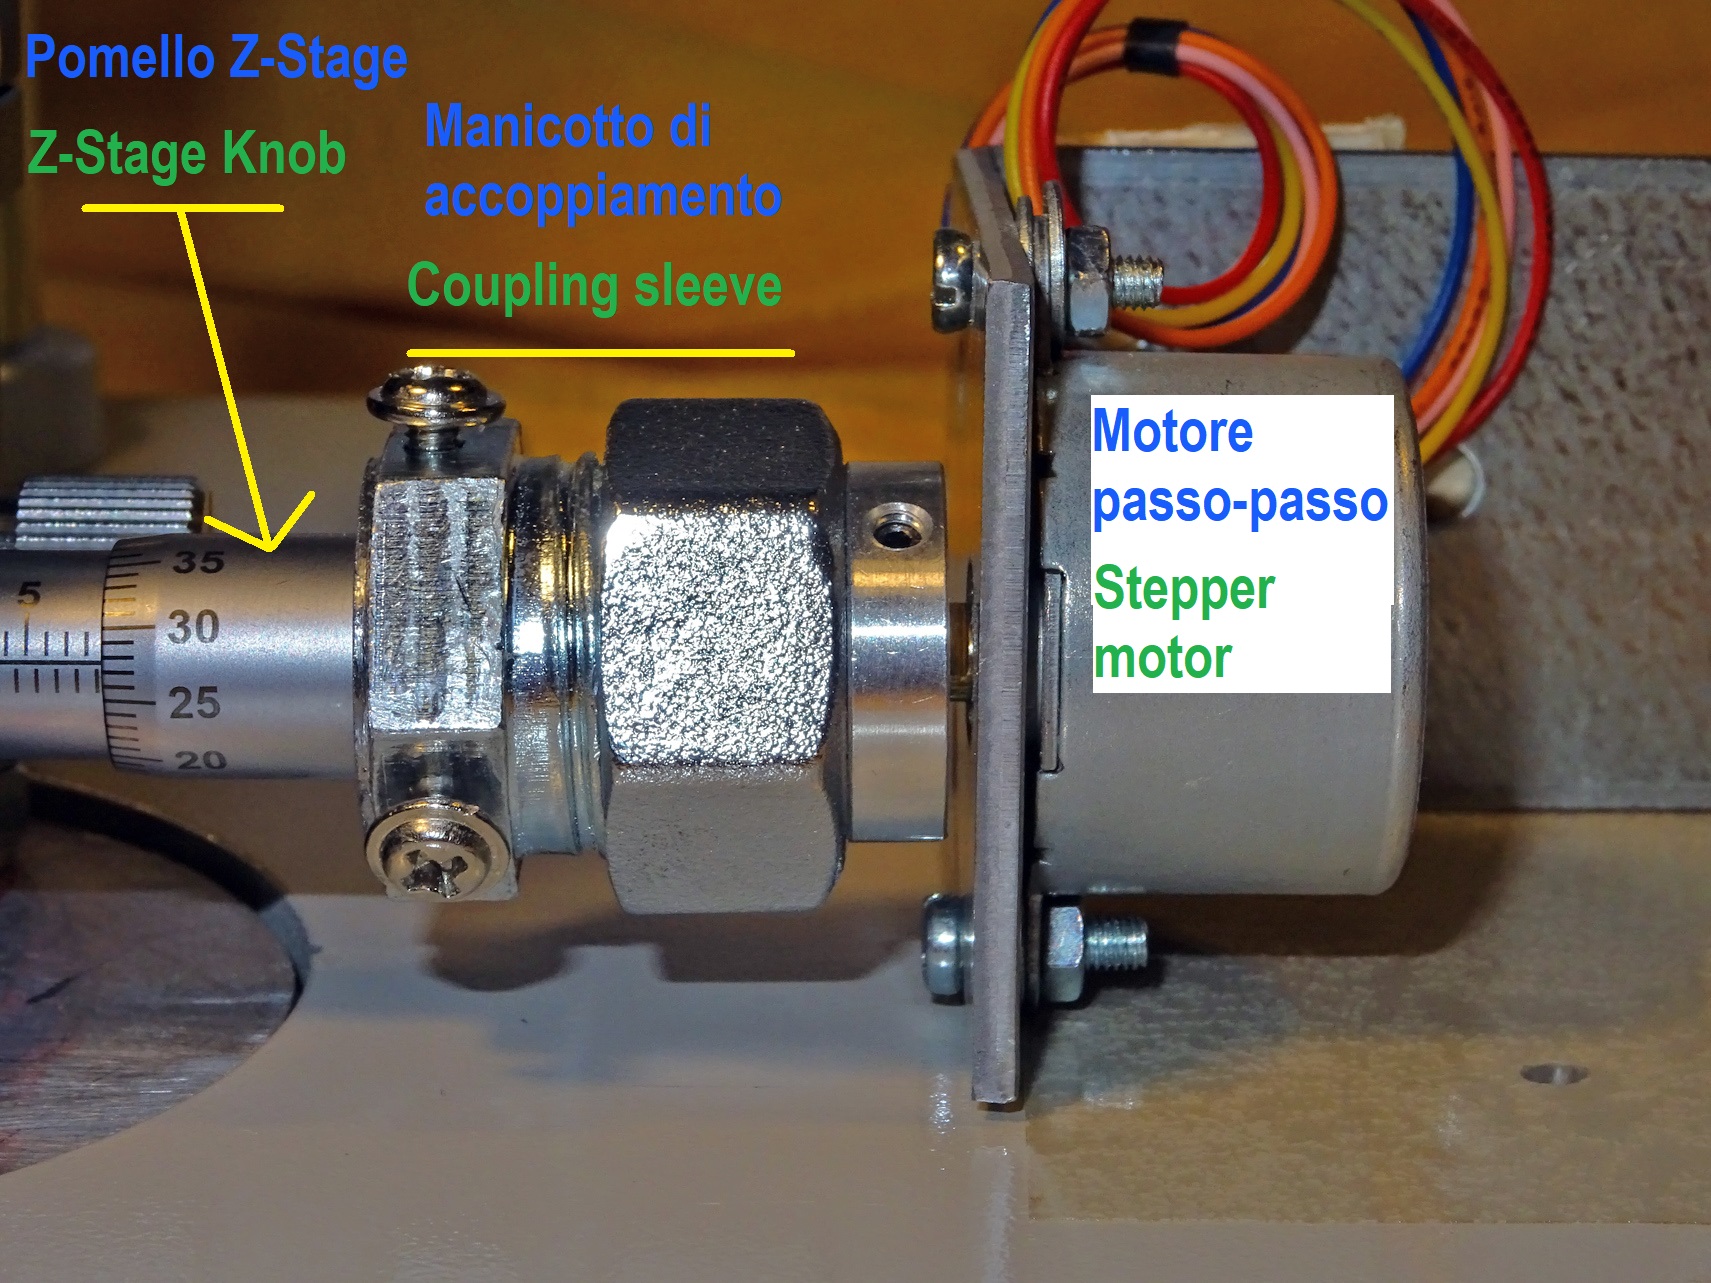
Dettaglio dell'accoppiamento meccanicoL'immagine è autoesplicativa e mostra il manicotto montato tra motore passo-passo e pomello. |
|
Detail of the mechanical copulingThe picture is self-explanatory and shows the sleeve mounted between the stepper and the knob. |
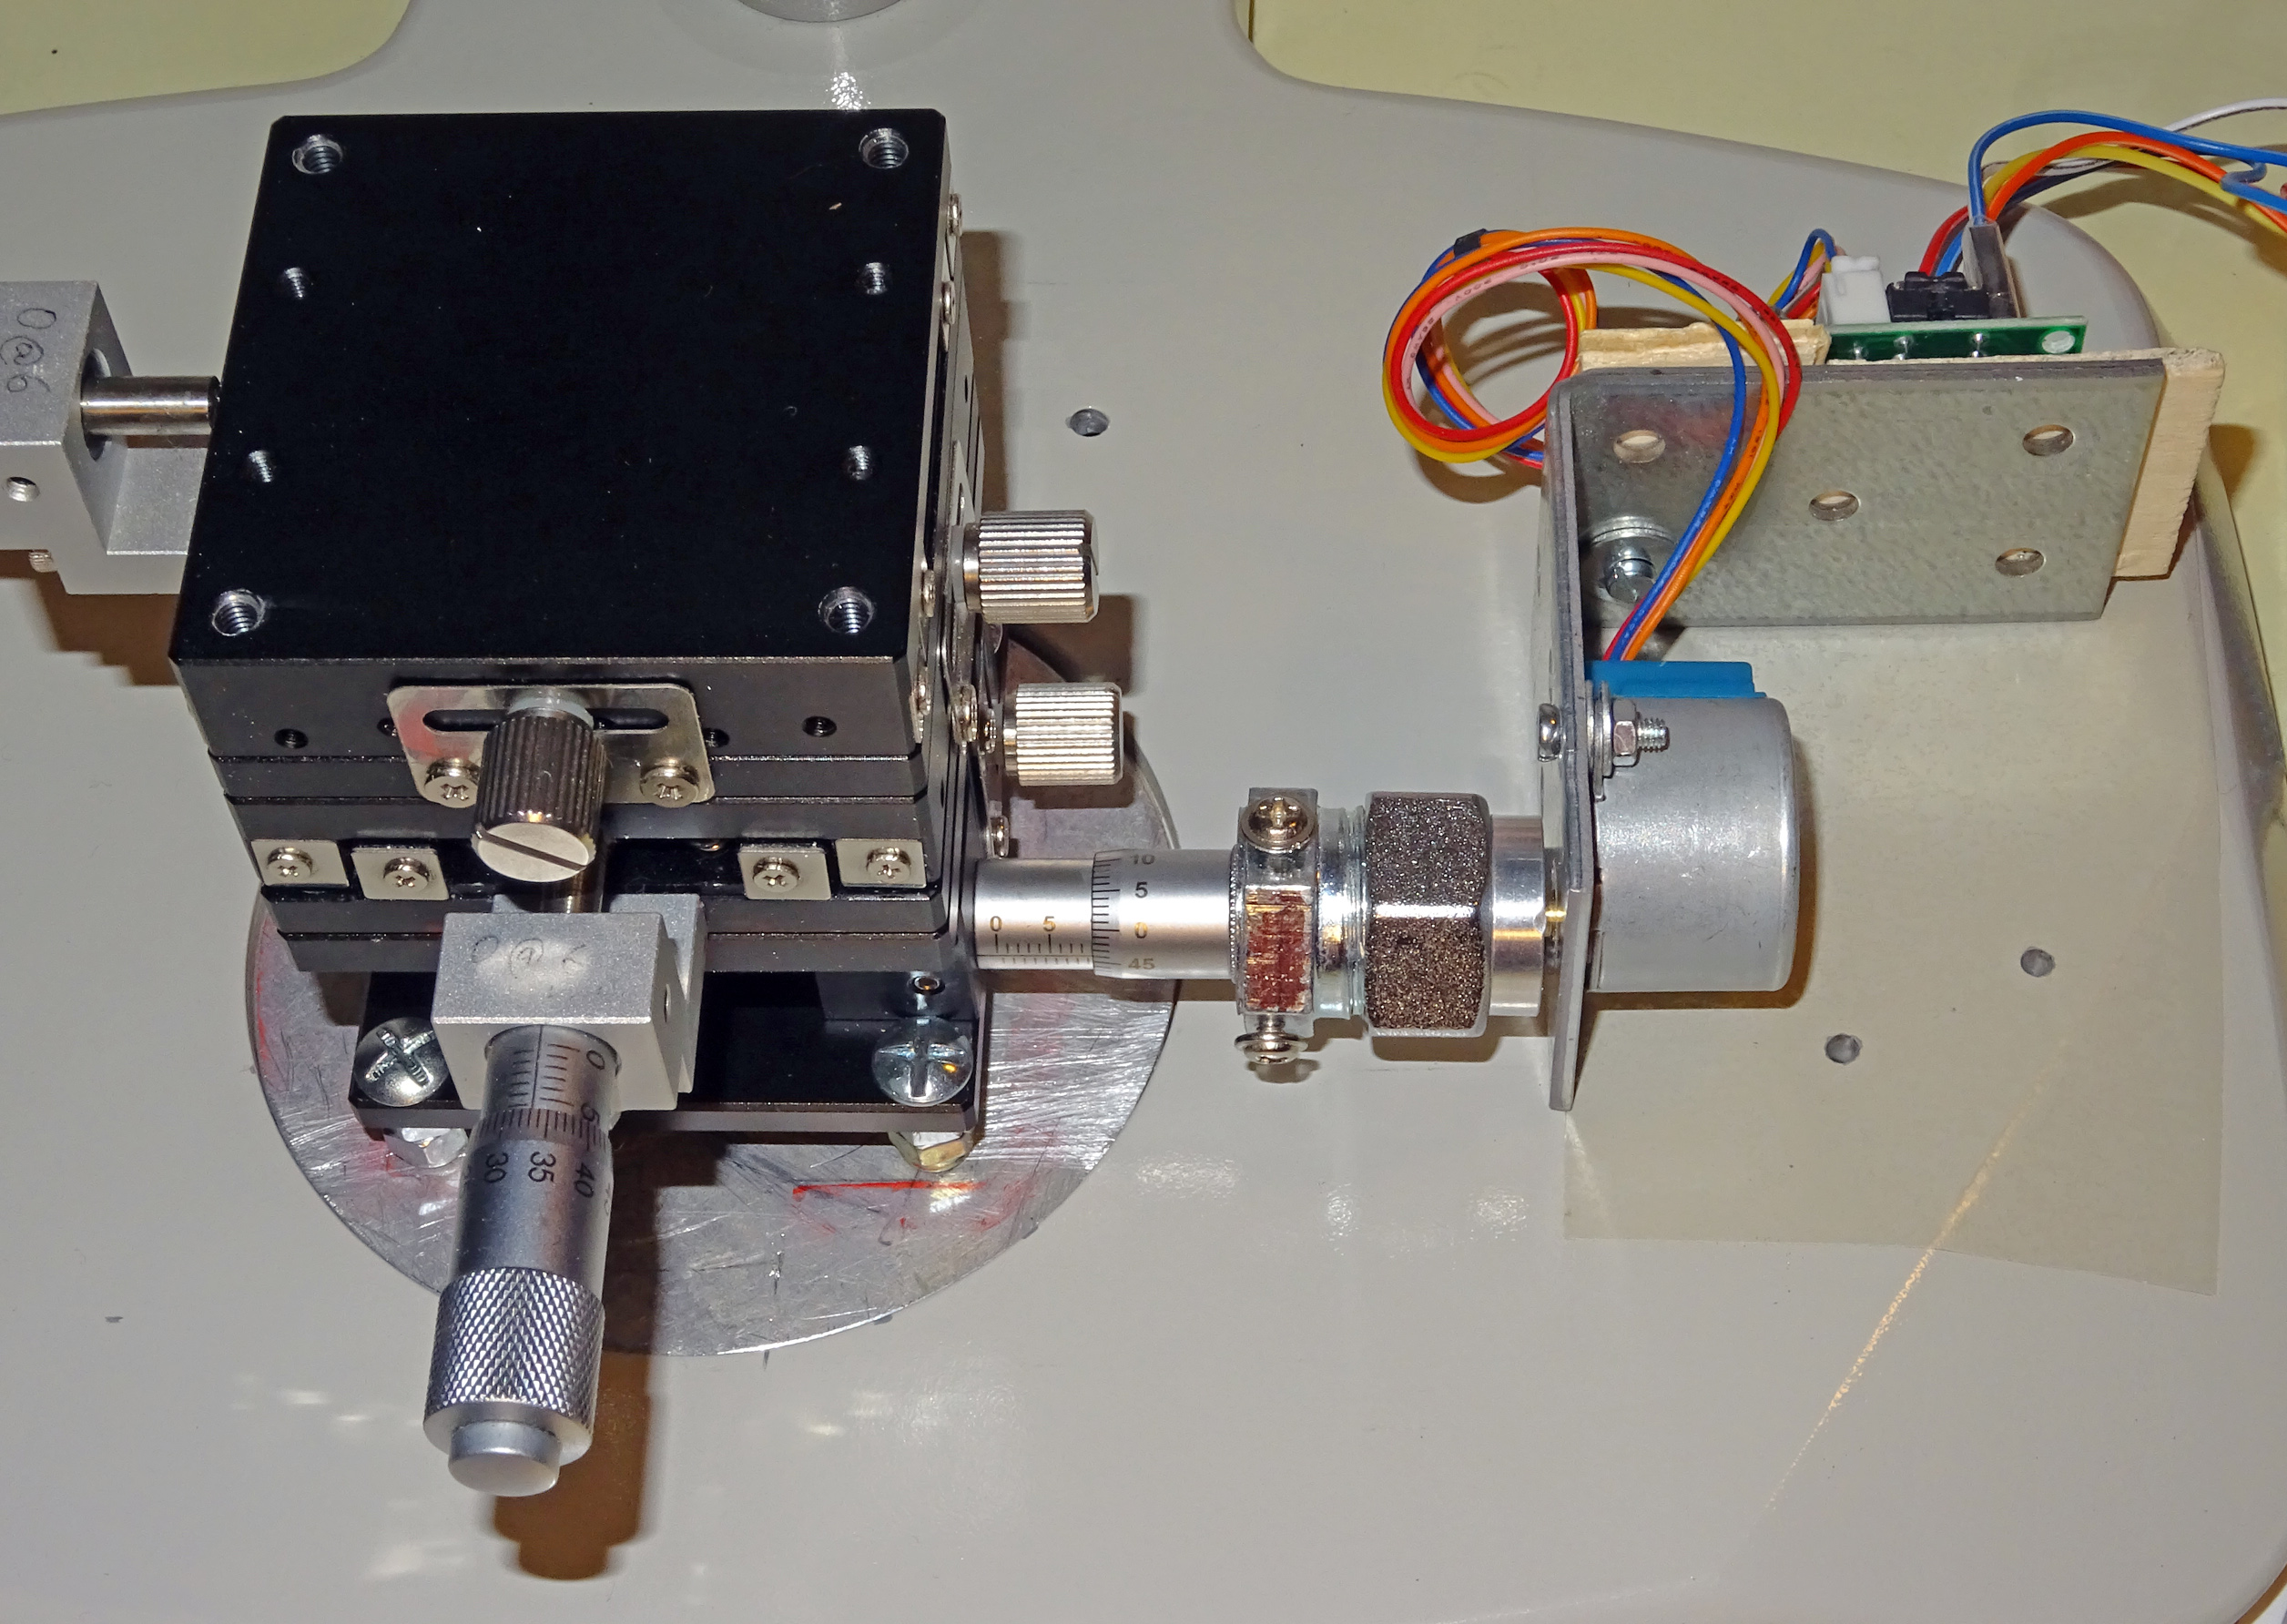
Setup completoEcco il setup completo, pronto per l'azione. |
|
Full setupHere is the complete setup, ready for action. |
/*

Stepper-based microscope Z-stage

Circuit and comments:
See http://www.cesarebrizio.it/Arduino/Z-Stage.html
Circuit is as illustrated here:
https://www.tdegypt.com/wp-content/uploads/2017/08/stepper-motor-wiring.png
the only exception being that the sketch uses digital outputs 4 - 5 - 6 - 7
while the Fritzing diagram uses digital outputs 8 - 9 - 10 - 11

 created 9 Jan 2021
 modified ----
 by Cesare Brizio

This example code is in the public domain.

This sketch controls the rotation of the knob of a microscope Z-stage
based on a stepper motor and custom-made mechanical coupling.
Stepper model is 28BYJ48, controlled via the X113647 Stepper Motor
Driver (based on the ULN2003A IC) normally purchased with the stepper.

The knob can rotate 360 degrees in both direction.
Commands for incremental rotation are provided.
The platform is managed by serial dialogue, managed via Serial Monitor
or Tera Term.
The following commands are implemented:
---> continuous rotation
R = Rotate clockwise continuously (meaning: for several turns)
L = Rotate counter-clockwise continuously (meaning: for several turns)
S = Stop rotating
---> 360 degrees  continuous rotation
r = Rotate for 360 degrees  clockwise
l = Rotate for 360 degrees  counter-clockwise
---> rotation by small increments
f = rotate 5 degrees  clockwise
F = rotate 5 degrees  counter-clockwise
t = rotate 10 degrees  clockwise
T = rotate 10 degrees  counter-clockwise
w = rotate 20 degrees  clockwise
W = rotate 20 degrees  counter-clockwise
q = rotate 40 degrees  clockwise
Q = rotate 40 degrees  counter-clockwise

It's very obvious that the source code could be optimized, but I preferred to keep
a repetitive structure with a separate IF for each possible value of incomingByte.

Sources of information:
Small stepper control: http://arduino-info.wikispaces.com/SmallSteppers

*/

/*-----( Import needed libraries )-----*/
#include <AccelStepper.h>

/*-----( Declare Constants and Pin Numbers )-----*/
/* NEVER PUT ; AFTER A #define statement!!!! */
// motor pins
#define motorPin1  4     // Blue   - 28BYJ-48 pin 1
#define motorPin2  5     // Pink   - 28BYJ-48 pin 2
#define motorPin3  6     // Yellow - 28BYJ-48 pin 3
#define motorPin4  7     // Orange - 28BYJ-48 pin 4
                        // Red    - 28BYJ-48 pin 5 (VCC)
                        // Blue   - 28BYJ-48 pin GND
#define STEPS_PER_TURN 2048 // number of steps in 360 degrees
#define STEPS_PER_FIVE 28 // number of steps in 5 degrees
#define STEPS_PER_TEN 57 // number of steps in 10 degrees
#define STEPS_PER_TWENTY 114 // number of steps in 20 degrees
#define STEPS_PER_FORTY 228 // number of steps in 40 degrees

int motorSpeed = 500; // High speeds (800 and above) may cause erratic behavior in 28BYJ-48
int motorAccel = 400; // As above: better avoiding extreme accelerations
int myPos = 0; // will be used to define a starting point for 360 degrees  rotations
int LeftTurnUp = 0; // Couple of flags to determine rotation direction
int RightTurnDown = 0; // Couple of flags to determine rotation direction
int Continuous = 0; // used below to discriminate single rotation commands
int incomingByte = 0; // for incoming serial data
int STEPS_TO_DO = 0; // to allocate the number of steps needed to perform the required rotation

/*-----( Objects for stepper control )-----*/
// Set up the stepper as 4 wire bipolar on pin 4,5,6,7
// NOTE: The sequence 1-3-2-4 is required for proper sequencing of 28BYJ48
AccelStepper stepper(4,motorPin1,motorPin3,motorPin2,motorPin4);

void setup()
{
  Serial.begin(9600);
  stepper.setMinPulseWidth(20); // Advisable setting to avoid that pulses from Arduino
                                // are too quick to be decoded
  stepper.setMaxSpeed(motorSpeed);
  stepper.setSpeed(motorSpeed);
  stepper.setAcceleration(motorAccel);
  // the following two lines reset "step zero" to the current position
  stepper.setCurrentPosition(stepper.currentPosition());
  stepper.runToPosition();
  Serial.println("Available commands:");
  Serial.println("====> Continuous rotation");
  Serial.println("R = continuous clockwise rotation");
  Serial.println("L = continuous counter-clockwise rotation");
  Serial.println("S = stop rotation");
  Serial.println("====> 360 degrees  Rotation");
  Serial.println("o = 360 degrees  clockwise rotation");
  Serial.println("O = 360 degrees  counter-clockwise rotation");
  Serial.println("====> Rotation by small increments");
  Serial.println("f = rotate 5 degrees  clockwise");
  Serial.println("F = rotate 5 degrees  counter-clockwise");
  Serial.println("t = rotate 10 degrees  clockwise");
  Serial.println("T = rotate 10 degrees  counter-clockwise");
  Serial.println("w = rotate 20 degrees  clockwise");
  Serial.println("W = rotate 20 degrees  counter-clockwise");
  Serial.println("q = rotate 40 degrees  clockwise");
  Serial.println("Q = rotate 40 degrees  counter-clockwise");
}

void loop()
{

  if (Serial.available() > 0)
  {
    incomingByte = Serial.read();
    {
      if (incomingByte == 'R')
      {
        Serial.println("received R - activating continuous clockwise rotation");
        // The two lines that follow allow to send commands in any sequence:
        // before execution, a quick stop is performed
        stepper.stop(); // Stop as fast as possible: sets new target
        stepper.runToPosition(); // Now stopped after quickstop
        // The following couple of flags determines rotation direction
        LeftTurnUp = 0;
        RightTurnDown = 1;
        Continuous = 1; // used below to discriminate single rotation commands
        stepper.setCurrentPosition(stepper.currentPosition()); // Set step 0 "here"
        stepper.setSpeed(motorSpeed); // Previous commands have reset the speed
      }

      if (incomingByte == 'L')
      {
        Serial.println("received L - activating continuous counter-clockwise rotation");
        // The two lines that follow allow to send commands in any sequence:
        // before execution, a quick stop is performed
        stepper.stop(); // Stop as fast as possible: sets new target
        stepper.runToPosition(); // Now stopped after quickstop
        // The following couple of flags determines rotation direction
        RightTurnDown = 0;
        LeftTurnUp = 1;
        Continuous = 1; // used below to discriminate single rotation commands
        stepper.setCurrentPosition(stepper.currentPosition()); // Set step 0 "here"
        stepper.setSpeed(motorSpeed); // Previous commands have reset the speed
      }

      if (incomingByte == 'S')
      {
        Serial.println("received S - stopping rotation");
        // Reset the flags that determine rotation direction
        LeftTurnUp = 0;
        RightTurnDown = 0;
        stepper.stop(); // Stop as fast as possible: sets new target
        stepper.runToPosition(); // Now stopped after quickstop
      }

      if (incomingByte == 'o')
      {
        Serial.println("received o - activating single clockwise rotation");
        // The two lines that follow allow to send commands in any sequence:
        // before execution, a quick stop is performed
        stepper.stop(); // Stop as fast as possible: sets new target
        stepper.runToPosition(); // Now stopped after quickstop
        // The following couple of flags determines rotation direction
        LeftTurnUp = 0;
        RightTurnDown = 1;
        Continuous = 0; // used below to discriminate single rotation commands
        stepper.setCurrentPosition(stepper.currentPosition()); // Set step 0 "here"
        stepper.setSpeed(motorSpeed); // Previous commands have reset the speed
        // Since I will have to step forward 2047 steps, I store my current
        // position as starting point of the rotation
        myPos=stepper.currentPosition();
        STEPS_TO_DO = STEPS_PER_TURN;
      }

      if (incomingByte == 'O')
      {
        Serial.println("received O - activating single counter-clockwise rotation");
        // The two lines that follow allow to send commands in any sequence:
        // before execution, a quick stop is performed
        stepper.stop(); // Stop as fast as possible: sets new target
        stepper.runToPosition(); // Now stopped after quickstop
        // The following couple of flags determines rotation direction
        RightTurnDown = 0;
        LeftTurnUp = 1;
        Continuous = 0; // used below to discriminate single rotation commands
        stepper.setCurrentPosition(stepper.currentPosition()); // Set step 0 "here"
        stepper.setSpeed(motorSpeed); // Previous commands have reset the speed
        // Since I will have to step backwards 2047 steps, I store my current
        // position as starting point of the rotation
        myPos=stepper.currentPosition();
        STEPS_TO_DO = STEPS_PER_TURN;
      }


      if (incomingByte == 'f')
      {
        Serial.println("received f - activating 5 degrees  clockwise rotation");
        // The two lines that follow allow to send commands in any sequence:
        // before execution, a quick stop is performed
        stepper.stop(); // Stop as fast as possible: sets new target
        stepper.runToPosition(); // Now stopped after quickstop
        // The following couple of flags determines rotation direction
        LeftTurnUp = 0;
        RightTurnDown = 1;
        Continuous = 0; // used below to discriminate single rotation commands
        stepper.setCurrentPosition(stepper.currentPosition()); // Set step 0 "here"
        stepper.setSpeed(motorSpeed); // Previous commands have reset the speed
        // Since I will have to step forward STEPS_PER_FIVE steps, I store my current
        // position as starting point of the rotation
        myPos=stepper.currentPosition();
        STEPS_TO_DO = STEPS_PER_FIVE;
      }

      if (incomingByte == 'F')
      {
        Serial.println("received F - activating 5 degrees  counter-clockwise rotation");
        // The two lines that follow allow to send commands in any sequence:
        // before execution, a quick stop is performed
        stepper.stop(); // Stop as fast as possible: sets new target
        stepper.runToPosition(); // Now stopped after quickstop
        // The following couple of flags determines rotation direction
        RightTurnDown = 0;
        LeftTurnUp = 1;
        Continuous = 0; // used below to discriminate single rotation commands
        stepper.setCurrentPosition(stepper.currentPosition()); // Set step 0 "here"
        stepper.setSpeed(motorSpeed); // Previous commands have reset the speed
        // Since I will have to step backwards STEPS_PER_FIVE steps, I store my current
        // position as starting point of the rotation
        myPos=stepper.currentPosition();
        STEPS_TO_DO = STEPS_PER_FIVE;
      }


      if (incomingByte == 't')
      {
        Serial.println("received t - activating 10 degrees  clockwise rotation");
        // The two lines that follow allow to send commands in any sequence:
        // before execution, a quick stop is performed
        stepper.stop(); // Stop as fast as possible: sets new target
        stepper.runToPosition(); // Now stopped after quickstop
        // The following couple of flags determines rotation direction
        LeftTurnUp = 0;
        RightTurnDown = 1;
        Continuous = 0; // used below to discriminate single rotation commands
        stepper.setCurrentPosition(stepper.currentPosition()); // Set step 0 "here"
        stepper.setSpeed(motorSpeed); // Previous commands have reset the speed
        // Since I will have to step forward STEPS_PER_TEN steps, I store my current
        // position as starting point of the rotation
        myPos=stepper.currentPosition();
        STEPS_TO_DO = STEPS_PER_TEN;
      }

      if (incomingByte == 'T')
      {
        Serial.println("received T - activating 10 degrees  counter-clockwise rotation");
        // The two lines that follow allow to send commands in any sequence:
        // before execution, a quick stop is performed
        stepper.stop(); // Stop as fast as possible: sets new target
        stepper.runToPosition(); // Now stopped after quickstop
        // The following couple of flags determines rotation direction
        RightTurnDown = 0;
        LeftTurnUp = 1;
        Continuous = 0; // used below to discriminate single rotation commands
        stepper.setCurrentPosition(stepper.currentPosition()); // Set step 0 "here"
        stepper.setSpeed(motorSpeed); // Previous commands have reset the speed
        // Since I will have to step backwards STEPS_PER_TEN steps, I store my current
        // position as starting point of the rotation
        myPos=stepper.currentPosition();
        STEPS_TO_DO = STEPS_PER_TEN;
      }


      if (incomingByte == 'w')
      {
        Serial.println("received w - activating 20 degrees  clockwise rotation");
        // The two lines that follow allow to send commands in any sequence:
        // before execution, a quick stop is performed
        stepper.stop(); // Stop as fast as possible: sets new target
        stepper.runToPosition(); // Now stopped after quickstop
        // The following couple of flags determines rotation direction
        LeftTurnUp = 0;
        RightTurnDown = 1;
        Continuous = 0; // used below to discriminate single rotation commands
        stepper.setCurrentPosition(stepper.currentPosition()); // Set step 0 "here"
        stepper.setSpeed(motorSpeed); // Previous commands have reset the speed
        // Since I will have to step forward STEPS_PER_TWENTY steps, I store my current
        // position as starting point of the rotation
        myPos=stepper.currentPosition();
        STEPS_TO_DO = STEPS_PER_TWENTY;
      }

      if (incomingByte == 'W')
      {
        Serial.println("received W - activating 20 degrees  counter-clockwise rotation");
        // The two lines that follow allow to send commands in any sequence:
        // before execution, a quick stop is performed
        stepper.stop(); // Stop as fast as possible: sets new target
        stepper.runToPosition(); // Now stopped after quickstop
        // The following couple of flags determines rotation direction
        RightTurnDown = 0;
        LeftTurnUp = 1;
        Continuous = 0; // used below to discriminate single rotation commands
        stepper.setCurrentPosition(stepper.currentPosition()); // Set step 0 "here"
        stepper.setSpeed(motorSpeed); // Previous commands have reset the speed
        // Since I will have to step backwards STEPS_PER_TWENTY steps, I store my current
        // position as starting point of the rotation
        myPos=stepper.currentPosition();
        STEPS_TO_DO = STEPS_PER_TWENTY;
      }


      if (incomingByte == 'q')
      {
        Serial.println("received q - activating 40 degrees  clockwise rotation");
        // The two lines that follow allow to send commands in any sequence:
        // before execution, a quick stop is performed
        stepper.stop(); // Stop as fast as possible: sets new target
        stepper.runToPosition(); // Now stopped after quickstop
        // The following couple of flags determines rotation direction
        LeftTurnUp = 0;
        RightTurnDown = 1;
        Continuous = 0; // used below to discriminate single rotation commands
        stepper.setCurrentPosition(stepper.currentPosition()); // Set step 0 "here"
        stepper.setSpeed(motorSpeed); // Previous commands have reset the speed
        // Since I will have to step forward STEPS_PER_TWENTY steps, I store my current
        // position as starting point of the rotation
        myPos=stepper.currentPosition();
        STEPS_TO_DO = STEPS_PER_FORTY;
      }

      if (incomingByte == 'Q')
      {
        Serial.println("received Q - activating 40 degrees  counter-clockwise rotation");
        // The two lines that follow allow to send commands in any sequence:
        // before execution, a quick stop is performed
        stepper.stop(); // Stop as fast as possible: sets new target
        stepper.runToPosition(); // Now stopped after quickstop
        // The following couple of flags determines rotation direction
        RightTurnDown = 0;
        LeftTurnUp = 1;
        Continuous = 0; // used below to discriminate single rotation commands
        stepper.setCurrentPosition(stepper.currentPosition()); // Set step 0 "here"
        stepper.setSpeed(motorSpeed); // Previous commands have reset the speed
        // Since I will have to step backwards STEPS_PER_TWENTY steps, I store my current
        // position as starting point of the rotation
        myPos=stepper.currentPosition();
        STEPS_TO_DO = STEPS_PER_FORTY;
      }


    }
  }

  if (Continuous == 1) // continuous rotation
    {
    if (LeftTurnUp == 1)  //left turn
      {
        stepper.moveTo(10000); //move many steps - more then mechanical needed
    }

    if (RightTurnDown == 1)  //right turn
      {
       stepper.moveTo(-10000); //move many steps - more then mechanical needed
    }
    stepper.run();
  }
  if (Continuous == 0) // continuous rotation
    {
    if (LeftTurnUp == 1)  //left turn
      {
        stepper.moveTo(myPos+STEPS_TO_DO); // number of  steps in 5, 10, 20 or 360 degrees
    }

    if (RightTurnDown == 1)  //right turn
      {
       stepper.moveTo(myPos-STEPS_TO_DO); // number of  steps in 5, 10, 20 or 360 degrees
    }
  }
  stepper.run();
}
❦